Losi Promoto Motorcycle Light Kit


Losi Promoto Motorcycle Light Kit
Amp up your Losi Promoto Motorcycle with MyTrickRC's Losi Promoto Motorcycle Light Kit! This sleek and simple Light Kit has Nice Bright Scale Light Pods in front, a Scale Tail Light Pod tucked up inside the Rear Fender, and is a snap to install. We chose the LED mounting locations on the Losi Promoto Motorcycle Light Kit to protect them from collisions. The locations are away from the bike's normal high impact, high wear areas. And of course, the LEDs on the Losi Promoto Motorcycle Light Kit meet MyTrickRC's high standards for Crazy Brightness - even in broad daylight.
Features
- Custom-designed Light Kit complements the Promoto's rad styling
- Handle Bar-mounted Light Pods help you see when the bike is banking and turning even from far away
- Tail Light Pod lets everyone see your bike pulling away from the competition
- LEDs are very Bright and Functional both Day and Night
- Lights Power On/Off with the Bike
- Simple, hassle-free operation
- Easy Assembly and Installation
What's Included
- 1-pair SP4 High Brightness Light Pods
- 1- Tail Light Pod
- 1- PAL3 Power Supply
Notes
This Light Kit powers directly off the Receiver.
The Tail Light Pod includes a strong Adhesive Pad for installation. If you want added security adhering to the Rear Fender, adding some Zap Goo, Shoe Goo, or E-6000 around a couple edges works very well for these parts. These adhesives bond to both parts well.
**Be sure the Rear Fender is very clean before applying the Tail Light Pod. Clean the Promoto's Rear Fender with isopropyl alcohol (rubbing alcohol). Clean the surface twice, allow the alcohol dry fully, then install the Tail Light Pod by pressing the adhesive pad on the Tail Light Pod firmly in place. It takes about 24hrs for the adhesive pad to fully bond to both parts. Use the Bike gently during these first 24hrs after installing the Tail Light Pod.
Installation
Remove the Left Side Panel.

Next, remove the black Motor Cover to expose the Receiver.

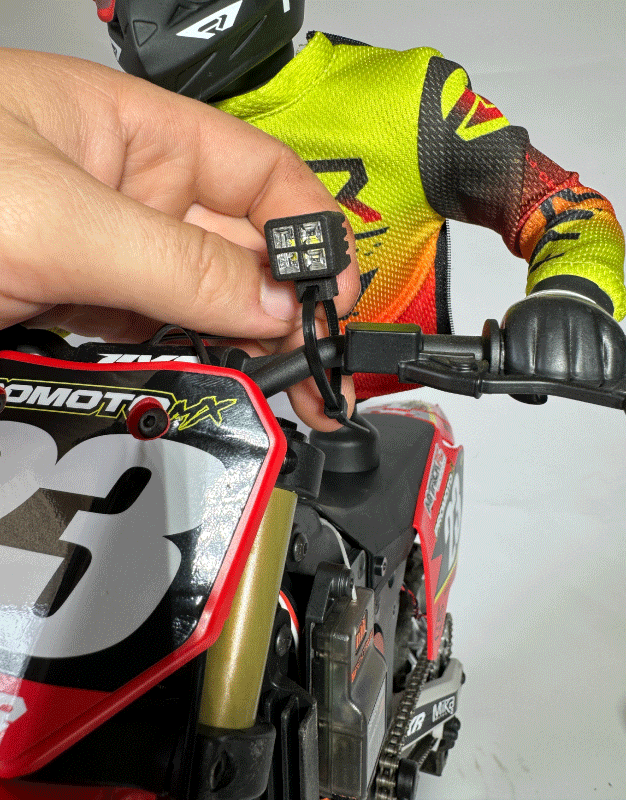
Now zip tie the SP4 Light Pods to the Handle Bars as shown. Be sure to pull the zip tie as tightly as you can. As an option, to reduce the possibility of the SP4 Light Pods slipping or rotating on the Handle Bars, you can add a tiny dab of Zap Goo, Shoe Goo, or E-6000 to bases of the Light Pods just before zip tying them into place.
Feed the SP4 Light Pods wire behind the Radiator as shown so that the wire comes out near the Receiver.


Next, connect the Light Kit's Power Supply to the Receiver's Aux 1 Channel.

Connect the SP4 Light Pods to the Power Supply and place as shown. Connect the SP4 Light Pods to either Black High Power Port on the Power Supply. You can use double stick tape, Zap Goo, Shoe Goo, or E-6000 to bond the Power Supply to the Bike.

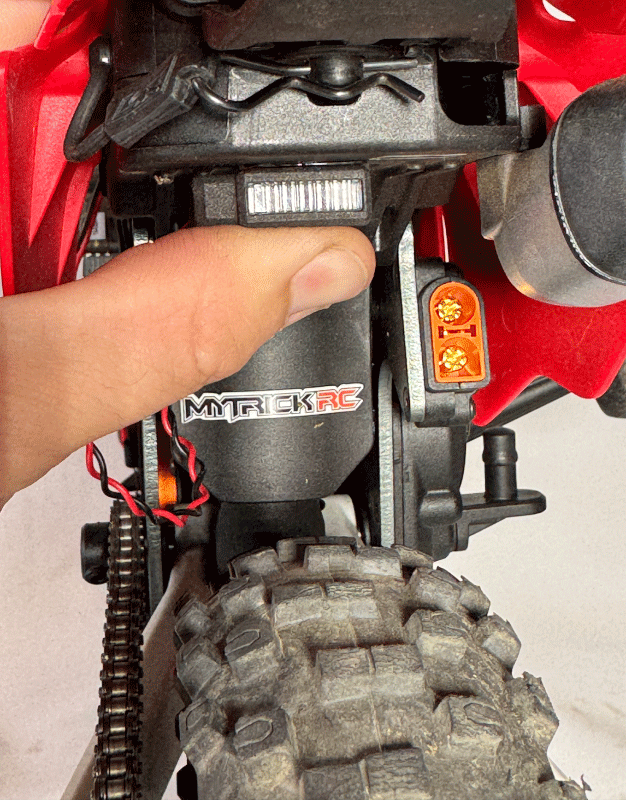
Next feed the Tail Light Pod wire though the small hole in the metal plate on the side of the Bike as shown.

Connect the Tail Light Pod to the White Low Power Port on the Power Supply.

Apply the 3M double stick tape to the flange on the Tail Light Pod then press the Tail Light Pod firmly up into the Rear Fender.
**NOTES**
1. Clean the Fender with rubbing alcohol before sticking Tail Light Pod into place.
2. It's a little difficult to show in our pics, but locate the Tail Light Pod far enough inside the Fender so that the tire doesn't touch it (about 2/3 to 3/4 the way inside the Fender).
3. For added security, you can apply Zap Goo, Shoe Goo, or E-6000 to the Light Pod and Fender to ensure it does not come loose.

Your Losi Promoto Light Kit is now installed. Re-install the Motor Cover and Left Side Panel, and you are DONE! Now you can fall in love with your Promoto.
- Super Bright SP4 Pods
- Tail Light Pod
- PAL3 Power Supply
- Simple Install
- Expandable